Vorlonagent's X2 Technology
This is a write-up of the technology used by the X2 ships listed here.
Any resemblance to X2 technology elsewhere (especially at at the
ADB's X2 topic)
is intentional. When I list an idea by someone else. I should give
credit where it is due. Systems are currently in the order I wrote them up
in. I have not made any semblance of trying to group them.These
articles are periodically edited because they're mine and it's my site.
Many weapons
include a "Balance" section. It's not there because I can't make up my
mind about how I want the system to work. It's there in case someone says,
"I like the system but it needs something" or "it's a little too good". I
thought I'd throw in a few ways of helping even things out.
Index of Rules
The Advanced Structural Integrity Field (ASIF)
Designer's Notes: I had one or two ideas on advanced technology based on thinking about doing ships from
Babylon 5 in SFB. I came up with the ASIF when I wondered how I would work the super-advanced Vorlons and
Shadows in SFB. How would I make them tougher without padding the ships with a lot of pointless hull or other
systems. I didn't want armor because armor is 1) restricted to old-tech and 2) it only provided surface protection. It would not give a feeling of "toughness." Big shields by themselves have the same problem as 2). So I decided to shield each line of the DAC. I could control how tough a ship would be at each column by varying the amount of shielding. Applied to 2X ships,
I could also vary the depth and protection to provide additional racial flavor.
Concept: All starships use structural integrity fields to hold the ships together
during warp travel and against the intense energies thrown at a ship in
combat. This is done transparently in previous grades of technology, more
or less enabling the ship to take damage according to the DAC. The ASIF takes
this to a new level by actually giving an amount of defense against damage.
Deployment: The ASIF was used by all major powers on X2 warships.
It is a hull modification and therefore cannot be mounted in option mounts.
Cost:
The ASIF costs the same as the cost of going from minimum shields to full shields. For
SC4 units, the cost is 1/2, SC3 is 1, SC2 is 3. The power may come from
any source. The power may come from reserve power.
Operation: The ASIF is raised or lowered at
the same time and under the same rules as normal shields.
The ASIF may be raised and lowered independently from other shields. It may not be
raised in response to combat damage. An operating ASIF may be reinforced
in response to combat damage (see Reinforcement below) The ASIF is independent from other
shields on the ship. It may be raised regardless of whether the ship is
using full, minimum or no shields.
Procedure: The ASIF is a single 360-degree
shield that blunts penetrating damage by shielding some or all of the columns of
the DAC. The ASIF display on the ship's SSD shows the shield boxes
designated for the DAC columns it defends. When a point of damage would normally
be done to a column protected by an undestroyed ASIF box, a box on the
corresponding column of the ASIF display is marked off instead. When all
boxes for the column are marked as destroyed, damage is allocated normally using
established DAC procedures. The player must record damage to the ASIF
before recording any damage to the corresponding column of the DAC (or deeper
columns). He may not choose to let some damage through.
Reinforcement: The ASIF may be reinforced by
either general or specific reinforcement. Reinforcement fills in the ASIF starting from the deepest columns working out
toward the "A" column. Each column must be filled in before reinforcement
can fill in the next column. If the "A" column is entirely
filled, the reinforcement adds onto the "A" column.
EXAMPLE: An ASIF with all its "A": column boxes destroyed as well as 4 of 6
boxes of its B column, is reinforced with 6 points of specific
reinforcement. All 4 points of "B" column damage would have to
be filled in before any reinforcement would defend the "A" column.
Since the reinforcement is cut in half, the "B" column gains 3 points
of those 4.
General Reinforcement: The ASIF uses the ships general
reinforcement system. Under normal circumstances, a ship's general
reinforcement would be exhausted before the ASIF would be able to use it.
If circumstances (example: leaky shields) allow the ship to take damage while
still having some general reinforcement left, the ASIF can be considered to be
reinforced by 1 box per 2 points of general reinforcement, rounding up When the
ASIF takes damage, 2 points of general reinforcement must be consumed if
possible.
Example: 3 or 4 points of general reinforcement would equate to 2 points of
general ASIF reinforcement.
Specific Reinforcement: The ASIF may be reinforced by 1 point
per 2 points of power allocated to specific reinforcement, rounded down.
Example: Allocating 4 points of power to specific ASIF
reinforcement produces two points of reinforcement. 3 points would produce
only 1.
Precedence: If an ASIF is reinforced with both General and specific
reinforcement, General reinforcement is consumed first.
Repair: The ASIF may be repaired my any means open to shields (repair
points, CDR and energy allocated to Damage Control). 2 points of Damcon energy
or points of CDR
will repair 1 ASIF box.
Repair Order: The ASIF box repairs similarly to
reinforcement. All deeper ASIF columns must be completely repaired before a shallower
ones may be repaired.
Single Source only: The ASIF can only receive repairs from one source per
turn.
EXAMPLE: An ASIF has been destroyed down to the "D" column, which has
4 points in it and has taken 2. 6 points of power is allocated to Damage
Control, repairing 3 ASIF boxes. The two "D" column boxes
must both be filled in before any "C" column boxes can be filled
in. Result is 2x "D" column boxes and 1 "C"
column box get repaired.
 Sample ASIF Chart: ISC XCC: This Chart
shows
Sample ASIF Chart: ISC XCC: This Chart
shows
8 boxes of protection to the "A" and "B" columns,
7 to "C" and "D",
5 to "E", 4 to "F",
3 to "G" and
2 to "H" and "I".
Balance:
1) Reduction - ASIF uses the "leaky
shield" rules, allowing 1 out of every 5 hits to bypass the ASIF entirely.
2) Reduction - Transporters are considered to be blocked as if by general reinforcement when
the ASIF is powered, raised and has any undestroyed boxes in the "A" or "B" columns.
3) Improvement - The ASIF can be repaired at the same rate
as other shields.
4) Improvement - Reinforcement to a ASIF is not cut in half
5) Improvement - Reinforcement and/or repairs may be made to a new column
if there is at least one box in a previous column.
EXAMPLE: If we have a
ASIF with its "D"
column down by 2 boxes and have repaired 3 ASIF boxes, we could skip repairing more "D"
row boxes (there's) 2 already there, repair 1 "C" column, box, which
would enable repairing one "B" column box, and finally repair one "A" row box. The "A" row could then be reinforced if needed or repaired
further in a future turn.
The ISC Heavy Plasmatic Pulsar Device (HPPD)
Designer's Notes: I looked at
ISC stuff with an eye toward improving the effectiveness of the echelon. I
figured a great place to start would be an improved PPD.
Concept: The HPPD does many things the same
way as an X1 PPD. It simply hits harder and costs more energy.
Deployment: This system was built
exclusively by the ISC. Some examples found their way to the Orion
Pirates. The system can only be placed in X2 technology option mounts and
requires 3 adjacent option mounts.
Arming Costs: The Primary difference between
the HPPD and the X1 PPD is that each pulse costs 3 not 2 points of power.
Arming cycle is 6+6 for 4 pulses, can be 3+6 or 6+3 for three pulses or 3+3 for
two. 9 points of power on the second turn gives +3 pulses and makes it an
overload, +12 gives +4 pulses. The HPPD holds for 3 points regardless of
the number of pulses it is holding. The HPPD can be fast loaded in one
turn for 9 or 12, this produces 3 or 4 pulses respectively. The 12-point
fast-load may not be held. The 9-point fast-load can.
Downfiring: The HPPD may be fired as a
normal X1 PPD as long as the total energy held in the PPD is 12 points or
less. If this mode is chosen it operates in all ways as an X1 PPD.
(i.e. If there is energy over 8 in the PPD, it must be fired as an overload,
uses the normal PPD chart, etc.)
Procedure: When fired, the HPPD operates in
all ways like a normal or X1 PPD. Same myopic zone, same conditions for
wavelock, everything.
HPPD
Chart:
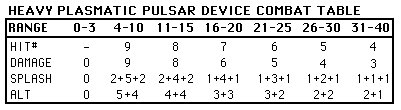
Balance:
1) Improvement: Increase Range 4-10 damage to 2+6+2
ISC Canister Plasma Torpedoes
Designer's Notes: Following up on
improving the PPD, I decided to work on ISC plasma. Large plasma
functions sort of like polearms behind the ISC's SC4 shield wall, punishing anyone who
engages or tries to penetrate the wall, letting the archers (PPDs) pick them off
at a distance. Seemed to me a plasma polearm that you could swing once every three
turns was awful slow, so I made up canister plasma to speed up the firing
rate. To counterbalance the considerable advantage, I shrunk the ISC's plasma torp
sizes back to General War standards (S- and F-torps). Going back to
F-torps from L-torps also helped the ISC power situation when reloading.
The 2-2-3 arming cycle for all those lateral L-torps just seemed like a constant drain the last time I sat in
an ISC CCX's command chair.
Concept: ISC engineers applied Plasma-D/K
technology to larger plasma torpedoes, creating a reusable canister system that would
hold an entire F-torp or the first two turns of arming for L and larger
torps. Only F, L, G and S torps were eligible for the canister
system. Launchers larger than S-torps proved completely incompatible with
the canister system. The ISC embraced the canister system and discontinued
all use of larger types of plasma.
Deployment: This system was built
exclusively by the ISC. Some examples found their way to the Orion
Pirates. The system can only be placed in X2 technology option mounts.
Canister plasmas fit into option mounts in the same way as non-canister plasma
torpedoes of the same size.
Arming Costs: The Canister system does not
itself change how plasmas are armed or held in the launcher. Canisters
serve only as storage units. They cannot be be used to arm a plasma
torpedo in and of themselves.
Number of Canisters: Each plasma launcher
has two canisters associated with it. Neither canisters or torpedoes may be transferred
to a different launcher. (Exception:
Plasma Caster) All canister contents are lost when the
plasma launcher is destroyed.
Holding Cost: Canisters hold their contents independently from each
other and any plasma being armed or held in the launcher. Canisters hold
their contents for free. This does not alter the cost of arming or holding
a plasma in the launcher.
Firing Rate: A given Canister plasma launchers may not launch or bolt
more than one plasma per turn or within 8 impulses of launching or bolting a
previous plasma. Lateral F-torps remain under those restrictions as well.
Weapon Status: Ships do not always
start a scenario with their canisters prepared.
| WS 0 |
The plasma launcher and all
canisters are empty |
| WS 1 |
The launcher is empty but may have
one canister loaded with the player's choice of a plasma torpedo in its
second turn of arming or a complete F-torp. |
| WS 2 |
Both canisters are loaded per WS-I
prior to Turn 1 EA. |
| WS 3 |
The launcher is holding an
torpedo per (S4.1) and other applicable rules and both canisters are loaded
per WS-1. |
Plasma Transfer Procedure: A plasma may be
transferred to or from a canister at the end of a given turn. Only one
transfer operation may occur, either from the launcher to a canister or from a
canister to a launcher, not both. A canister must be empty to accept a
plasma transfer.
At no time can a F-torp be converted into a second-turn-armed proto plasma
torpedo. Transfers to and from canisters and launchers conserve the state
of the contents. A F-torp transferred to a
canister will always return to the launcher as a F-torp. A F-torp armed in
the launcher may not be transferred to a canister as a second-turn proto-plasma. Nor can a
held second-turn proto-plasma be changed into a F-torp except by the established
rules of plasma arming.
Transferring the
contents of a canister to a non-empty launcher will force the launcher to eject its
contents.
F-Plasmas must be completely armed and ready to fire before they can be
transferred to a canister. Fast-loaded F-torps in larger launchers are
just as eligible for transfer to a canister as a normally-armed F-torp in a
F-launcher. These rules do not grant the F-Plasma any new arming options
beyond transfer to/from a canister.
Plasmas larger than F must have completed a minimum of their second turn
of arming (or be held under rolling delay) before being eligible for transfer to a canister. Plasmas
in their third turn of arming may also be transferred to a canister but the
third turn of arming must be ejected and the amount of energy used in the third
turn must be announced. The actual nature of the ejected third turn need
not be announced. All non-F plasmas transferred to a canister become identical
second-turn proto-plasmas. They do not retain any characteristics of their
third turn of arming. EXAMPLE: A plasma-S is
armed as an enveloping non-sabot torp but the turn ends before a firing
opportunity occurs. The ship transfers the torp to an empty canister,
announcing an 8-point plasma ejection. when returned to the launcher two
turns later, it could be armed any way possible: sabot, no sabot, standard,
shotgun or enveloping again. It would not be limited to rearming as a non-sabot
enveloping torpedo. If it were armed as a sabot torpedo, it would lose its
sabot status upon transfer.
Balance:
1) Reduction - Decrease the number of canisters associated with a
launcher from two to one. This can be done across the board, to F-torps or
just lateral F-torps.
2) Improvement -Substitution transfer. The contents of a canister
and the launcher may switched even if both have plasma torps or proto-plasmas
in them.
3) Reduction - Transferring a plasma to or from a canister costs 1 point
of power. If using the "Substitution" improvement, the cost is
one point of power per plasma moved. If plasmas are simultaneously moved
from and to the launcher the cost would be 2 points of power.
4) Improvement - Canisters may hold first-turn-arming proto-plasmas.
5) Improvement - Allow a L or larger canister-plasma launcher to fast
load an empty launcher to the second-turn arming status in one turn for 5 total
power.
5) Reduction - Canisters are not reusable. They are destroyed when
their contents are removed and replaced between scenarios.
ISC Plasma Caster
Designer's Notes: I originally
built the Plasma Caster as an improvement to the F-torp box, but got
concerned about the potential advantages, especially when
it's mounted on forward-firing gunline ships. I had been playing with the idea
of a Plasma Caster as a separate box on the SSD and decided that was the way to
go.
Concept: ISC engineers
created a short-ranged warp slingshot system capable of tossing a small plasma
(F, D or K) up to 50,000km (5 hexes) from the ship. ISC engineers only
mounted them near F-plasma launchers and D-racks on the theory that larger launchers would
usually be arming large torpedoes that could not be cast.
Destruction: Plasma Casters are destroyed on
Drone hits.
Deployment: This system was built
exclusively by the ISC. Some examples found their way to the Orion
Pirates. The system can only be placed in X2 technology option mounts.
A Plasma Caster uses a single option mount, but can only accept plasmas from a
canister plasma launchers in the same block of option mounts as it is.
Weapon Status: Because they cannot
hold plasmas, Plasma Casters always start the game empty of Plasma. At
WS-2 or WS-3, a plasma caster may start the game holding a slingshot charge.
Usable Plasma types: Only a F, D or K plasma
may be launched using a Plasma Caster. L and larger torpedoes may not.
A new plasma variety may only launch via a plasma caster if its rules
specifically allow it.
Launch Rate: The Plasma Caster may not
launch more than one plasma per turn or within 8 impulses of a previous
launching.
Arming Costs: The plasma caster requires 2 points of warp power to
arm. Arming energy may come from reserve power. The arming cycle is
identical regardless of the type of plasma to be launched. Plasma Casters
may be held for 1 point of power (any source) on subsequent turns.
Cannot arm Plasmas: Plasma casters cannot do anything
with a plasma torpedo besides launch it. This includes but is not
limited to arming, saboting, bolting and holding plasma torpedoes.
Holding: A Plasma Caster may hold its slingshot charge
for
1 point of power from any source.
Cannot Hold Plasma: A Plasma caster cannot arm or
hold a plasma torp. A caster must eject
any unlaunched plasma at the end of any given turn.
Transfer Procedure: A fully armed plasma
(commonly a F-torp, but never larger than a F-torp) may be transferred from a launcher to a Plasma Caster if it
is associated with that caster. Plasma caster and launcher associations are defined in the
ship's description. Only canister plasma launchers may transfer a plasma to
a Plasma Caster. D-racks are considered canister plasma launchers for
purposes of these rules.
Counts as a Firing: When a plasma is transferred to the Caster, the
transferring launcher
is immediately considered to have launched a torpedo that turn regardless of when or if
the Plasma Caster launches the torpedo.
Shotgun: A plasma caster cannot accept transfer of a plasma created by a
shotgun.
Eligible Plasmas: Only the plasma actually in the launcher may be
transferred to a Plasma Caster. Plasmas in canisters may not be
transferred.
Transfer Timing: Transfer to a plasma caster may take place on any impulse.
The launcher is treated in all ways as having launched the plasma.
One-Way Transfer: Once a plasma is transferred to a Plasma Caster, it may
not be transferred back. It may be ejected at the end of a turn.
One Transfer per Turn: At no point may a Plasma Caster have more than one
plasma transferred to it on any given turn.
D-Plasmas: D- and K-Plasmas are transferred from their racks more or less
the same way as F-torps. The rack may transfer any torpedo stored in the
rack. The Caster will not accept an un-armed D- or K-torp and cannot arm
one. A D-rack must be eligible to bolt a torpedo in order to transfer to a
Plasma Caster. The rack is immediately considered to have bolted a plasma
if it transfers to a Plasma Caster regardless of when or if the Caster launches
the plasma.
Launch Procedure: Plasmas launch from a
Plasma Caster at the same point in the Sequence of Play as normal plasma
launches. The plasma may be placed anywhere within the Plasma Caster's
firing arc from the ship's hex up to 5
hexes away.
Required Use: The Plasma Caster must use its slingshot charge to launch
plasma. It cannot choose to simply release the plasma and continue to hold the
slingshot charge. Nor can it launch a plasma in any way (other than
ejecting) without the slingshot charge.
Firing Arc: The Plasma Caster has its own firing arc. It does not
use the firing arc of the launcher it got its plasma from. The plasma may
be placed in any hex of the launcher's firing arc up to 5 hexes from the ship.
Plasma Facing: A plasma launched by a Plasma Caster may only face those
directions consistent with the Plasma caster's firing arc.
EXAMPLE: A plasma Caster-armed ship facing A fires a
Plasma Caster with an AP firing arc. The plasma may be placed anywhere up
to 5 hexes away from the ship in its AP arc, but the plasma may only face C, D,
or E. If the ship were facing C, the plasma would be limited to facing A,
F or E.
Starting Conditions: Once the plasma is placed in its
destination hex, it functions in all ways as if it were launched from that hex.
Its turn and slip modes start out at 0, etc.
Bolting: Plasma Casters operate only on armed or held plasmas. They
may not bolt a plasma themselves or cast a plasma bolted in its launcher.
Independence of Operation: The act of launching a plasma from a Plasma
Caster does not in any way affect the launcher it got the plasma from.
Transferring the plasma to the caster is the only way a Plasma Caster can affect
a launcher.
Pseudo-Plasmas: Plasma launchers with
available pseudo-plasmas may transfer a pseudo-plasma to a Plasma Caster instead
of a real plasma. The pseudo is handled in all ways as a real plasma.
Launching a pseudo in all ways counts as firing the Plasma Caster.
Restrictions and Conditions:
Lateral Fire Control: Plasma Casters associated with ISC lateral plasma
torpedoes are integrated into the same defensive fire control system. The
plasma Caster is effectively another plasma launcher for purposes of those
rules, including the restriction on launching more than one plasma at SC 4 or
larger targets.
Crossing Distance: Plasmas launched by a Plasma Caster do cross
intervening distance. And do interact with intervening terrain.
Following a straight line: Cast plasma is always assumed to follow a
straight line between its launching ship and its destination hex. That
line would be used to determine which hexes it travels through and any terrain
it interacts with along the way.
Webs: Plasma casters may launch plasma normally into or through
0-strength web or cast web that has not yet solidified. Plasma casters may
launch plasma into web of greater than 0-strength but not through. The
plasma is treated in all ways as if it has been snared in the web normally.
The plasma does not get "credit" for any unused hexes of caster range, nor does
being caught in the web affect the plasma in any abnormal way.
Asteroids and Dust Clouds: A cast plasma is damaged by any asteroids or
dust clouds it travels through or into to get to its destination hex. They
are damaged as if moving at speed-31 by each intervening hex the plasma enters
or travels through. A plasma launched at range 0 does not incur damage
even if the ship is currently in a terrain hex. A cast plasma interacts
normally in all ways one it is placed in its destination hex.
Balance:
1) Reduction - Decrease the caster range from 5 hexes to 3.
2) Reduction - Eliminate the holding function for the
Caster itself.
3) Improvement - Allow the plasma caster to hold F-torps for 1 point and
D- or K-plasmas for free.
Romulan Heavy Plasma Torpedoes
Designer's Notes: I wanted to
give the Romulans a new "oh shit" monster plasma torpedo.
Figuring that the Roms would probably figure out how to bring R-torps into
general use in X2, something new would be needed to scare the crap out of everyone
else. So I came up with the Omega of plasma torpedoes, the last, biggest,
nastiest. The 80-point-warhead Type-Z. Mike Raper had the same idea
and came up with the 60-point Type-X. On my Rom SSD(s) Mike's Type-X torp
warhead chart
remains as it was set down by Mike. I like the X, but only +10 points of
damage over an R just doesn't seem enough to really evoke that bug-eyed,
dry-swallow in a Romulan opponent. It's also not nearly enough if you swap
two mainline Plasmas (M's or R's) for one X. I designed the Z-torp for
exactly this
niche. Together, I call Mike's and my proposals "Heavy Plasma Torpedoes",
because they both use a 3-3-X arming cycle. After the fact, I decided to
give the R-torp dual citizenship and an alternate Heavy Torpedo arming sequence.
The R's heavy torp arming sequence is a little inefficient (3-3-4) because it didn't
seem right to give the R a flat 3-3-3 arming sequence and 3-3-5 would be
too expensive.
Concept: X2 Technology saw a massive
improvement in plasma torpedo shielding and arming chamber construction.
The result was the fulfillment of a dream long-cherished by the Romulan
Admiralty: a return to the broad use of the Plasma-R. The problem was,
that X2 ships were so fast and so well-defended, the terror of the R-torp had
been lost. The new advances held out a solution here as well.
Romulan engineers were able to design practical plasma torpedoes with a warhead
strength above 50. Two such launchers, the X and
Z-torps, were built. The X-torp was created by Mike Raper
Similarity to other Plasmas: Except as noted
in these rules, Heavy Plasma torpedoes function identically to other plasma torpedoes.
Limited Deployment: SC4 and smaller units may not mount X or Z plasmas.
SC3 units mounting X or Z launchers are subject to shock unless stated otherwise
in their ship description (Re: XKE).
Deployment: Heavy Plasma torpedoes were deployed exclusively by
the Romulans. Some launchers fell into Orion hands as everything seems to
do. Heavy Plasma torpedoes can only be placed in X2 technology option
mounts. Rh torpedoes required 2 adjacent option mounts, X torpedoes
require 3, Z torpedoes require 4.
Medium Plasmas: Plasmas that use a 2-2-X
arming sequence (exception: the L-plasma) are considered medium torpedoes. The R-torp can be
considered either medium or heavy torpedo. R-torpedoes marked "Rh"
are considered heavy torpedoes and may use the alternate R-torp arming cycle. Regular R-torps are considered
medium and cannot.
Light Plasmas: Light plasmas are L, F, D and
K plasmas, along with any others that might use a 1-1-X arming sequence or have
a warhead smaller than a L-torp or may not use special arming modes like
enveloping, shotgun, etc. Note that the L-torp is considered a light
plasma and a G-torp is considered medium.
Arming Costs: Heavy Plasmas follow a 3-3-X
arming cycle. They may use all normal plasma arming modes (like shotgun,
enveloping, sabot, etc)
| Plasma |
First Turn |
Second Turn |
Third Turn |
Warhead |
Envelop/
Shotgun/ Sabot |
Shotgun
Torps |
Hold Cost |
Fast-load sequence |
SC3 Shock |
| First
Launch |
Later
Launches |
| Rh |
3 |
3 |
4 |
50 |
+5 |
4x L |
4 |
3 + 8 |
0 |
0 |
| X |
3 |
3 |
6 |
60 |
+6 |
5x L |
5 |
3 + 10 |
1d6-1 |
3 |
| Z |
3 |
3 |
8 |
80 |
+8 |
6x L |
no |
3 + 12 |
1d6+1 |
4 |
Heavy R-Torp Arming Sequence: A R-torp may be armed in a heavy plasma
launcher (and only a heavy plasma launcher) using a 3-3-4 arming sequence.
Heavy R-plasmas and heavy R-launchers are designated "Rh".
Rolling Delay: Heavy torpedoes may use rolling delay by allocating
3 points of energy (any source) on the third turn of arming. During the turn, 1 point of reserve power will
finish arming the
torpedo as a R-torp, 3 for a X-torp, 5 for a Z-torp.
Arming Non-Heavy Plasmas: Heavy Plasma
launcher can arm plasma torpedoes using 2-2-X or 1-1-X arming sequences.
Once an arming sequence is started, the launcher may only produce a plasma
appropriate to the sequence. A torpedo began as a medium plasma can only
end in the creation of a medium plasma (Same for small, and heavy plasmas). The
launcher cannot "shift gears". A launcher may eject a plasma and start
from scratch with reserve power. A heavy
plasma launcher may use all normal X1 plasma arming options. No medium plasma besides
an Rh-torp may be armed using a 3-3-X sequence.
Shock: The following rules are in
effect for all ships using X or Z plasmas. Exceptions will be handled in
the ship's description. SC3 units operating X or Z launchers
will normally incur shock (exceptions in ship description, i.e. Romulan
XKE).
SC2 and large ships will not incur shock. SC4 and smaller units may not mount X and Z
launchers.
Shock Rating: SC3 ships are assumed to have a shock rating of 16 unless stated
differently in a ship description.
SEPs: Unless stated differently, launching or bolting
a Type X plasma incurs 1d6-1 SEPs if no X or Z plasma has been launched within
32 prior impulses. Launching an X-plasma within 32 impulses of a previous
X or Z plasma launch incurs 3 SEPs. Launching a Type Z torpedo when no X
or Z torpedoes have been launched for the previous 32 impulses incurs
1d6+1 SEPs. Lauching a Z plasma within 32 impulses of a previous X or Z
torpedo launch incurs 4 SEPs. A SC3 ship may launch a Rh or smaller plasma
without incurring shock.
Shotguns and Envelopers: Unless stated otherwise, launching a shotgun or enveloping plasma counts as launching
two normal plasmas of the same type. Assuming a first launch, a ship would
take 1d6+2 SEPs for launching a shotgun or enveloping X plasma or 1d6+5 for a
shotgun or enveloping Z torp. A launch within 32 impulses would simply be
+6 SEPs (X torp) or +8 (Z torp). A bolted shotgun or enveloping plasma
counts as a single launch, not a double.
Shotgunned Heavy Torps: Heavy Plasmas
Produce L-torps when shotgunned, not F-torps. A R-plasma in a heavy
plasma launcher will shotgun as a Rh plasma if armed using the 3-3-9 shotgun sequence
or as 5 F-torps if shotgunned using the 2-2-10 shotgun sequence.
Fast-Loading a Heavy Torp: A Heavy Plasma launcher can
fast-load a 2-turn plasma torpedo through a version for the normal
rules. As with X1 fast-loading reserve power may be used to fast-load a
plasma.
Fast-Loading a Heavy Torp: If the first turn of arming is 3 points,
the torpedo may only be fast-loaded as a heavy plasma torp (Rh, X, Z). If
the second-Turn of arming is 8, the torpedo may be armed as a R, for 10 a X, for
12 a Z. A torpedo may not be fast-loaded as a type larger than the
launcher could otherwise arm. EPT, sabot or Shotguns may be armed for the
appropriate additional energy.
Fast-Loading as a Smaller Torp: If the First-turn of arming is 2 points,
a heavy torpedo launcher may be fast-load a plasma according to the X1 rules to
any size up to and including R-torps. X and Z torps may not be fast-loaded under
these circumstances.
Holding Torpedoes: Type Rh and X
torpedoes may be held for 4 and 5 points of power respectively. Atype-Z
plasma may not be held. A Z-plasma must be launched at the end of the turn or ejected.
As with smaller plasma launchers, a Type-Z launcher may arm a torpedo as a
Type-Rh
or Type-X and hold the plasma that way. The additional arming energy to
bring the torpedo up to Z strength may be paid on any subsequent EA or on any
impulse using reserve power per existing plasma rules. A Type-X launcher may
use this procedure to arm a Rh-plasma and use additional power to bring it to type-X strength later.
It may not arm a torpedo as a Z. Medium or light torpedoes in a heavy plasma launcher may not be upgraded to a X
or Z torps. They may be upgraded to R-torps according to the normal plasma
rules.
Swivel Mounts: X and Z launchers are
too big to use swivel mounts. Type-Rh
plasma launchers can. The advances in shielding and construction that made the X and Z
plasmas possible resulted in an R-torp compact enough to use swivels.
Balance:
1) Improvement - Allow shotgunned Rh, X or Z torps to use S-torps
instead of L-torps. Under these rules a Rh torp would shotgun for 3x
S-torps if armed and shotgunned as a heavy plasma. It would still shotgun
for 5x F if
armed as a normal 2-2-10 shotgun R. The X and Z torps would produce 4 and
5 S-torps respectively.
2) Improvement - If a medium or light torpedo held in a X or Z launcher is upgraded to
an R-torp it may be further upgraded to X or Z on the following turn if the hold
cost is paid at Energy Allocation.
Gorn Photon-Plasma Torpedoes
Designer's Notes: I wanted to
give the Gorns something a little different. I wanted to somehow combine
the photon torpedo and the plasma torp. Unable to come up with a
satisfactory complete synthesis, I decided to supplement the normal creamy
plasma goodness with a crunchy photon center. Early versions of this rule had
the photon dissipating if the plasma ran out of warhead strength, but I realized
that it created a sucky power-to-damage ratio. Now, when the plasma
dissipates, the photon shoots itself at the plasma's target.
Concept:
Eastern-race engineers always knew that a small object could be
placed in relative safety at the center of a plasma torpedo. This was how
plasma torpedoes were guided. Gorn researchers figured
out how to use a modified photon-freezer (based on those used in Federation
fighter bays) to inject a photon charge equivalent to a standard-load photon
torpedo into that center
area. The Photon charge replaced the guidance system and with a little work, the Gorns were able to keep the photon
charge stable over the time it took for the plasma
to either impact its target or dissipate entirely, at which point the photon
would launch itself at its target.
Similarity to other Plasmas: Except as noted
in these rules, Photon Plasma torpedoes function identically to other plasma torpedoes. Injecting
a photon charge into a plasma torpedo is optional. The plasma launcher may
arm and launch plasma torpedoes without having to launch with a photon charge.
Deployment: The photon-plasma system was
produced exclusively by the Gorns. Some weapons found their way into Orion
hands. The system can only be placed in X2 technology option mounts.
Photon-plasmas take up the same number of adjacent option mounts as non-photon
plasma launchers. Despite using photon torpedo technology, the Gorns
developed the system without Federation help and chose not to share it with
them.
Weapon Status: Photon Plasmas follow
normal plasma weapons status rules. Exception: at WS-3 any launcher that
is holding a plasma at the start of the game may start the game holding a photon
charge.
Eligibility: D and K plasmas are too small to
carry photon charges. F and larger torps can and did.
Arming Cost : Plasma arming costs are unchanged.
Holding Cost: The plasma in a
photon-plasma launcher holds normally for its size. A plasma with a photon
charge injected into it does not incur any additional holding cost.
Injecting a Photon Charge: A photon-plasma
launcher cannot accept transfer of a photon charge unless it is carrying a fully
armed plasma torpedo. the torpedo need not the the largest size the
launcher can arm, however. This may be done at the moment of plasma launch,
carronade or bolt. A
photon charge may also be injected during impulse procedure of any impulse. One
injected, the photon charge may not be removed again. If the plasma is
ejected for any reason, the charge must be ejected also. The presence of a photon charge must be
announced. An ejected photon charge is simply lost regardless of why it is
ejected.
It is possible to inject a photon charge into a plasma torpedo
long before the plasma is launched. A held plasma carrying a photon charge does
not incur any additional hold cost.
Maximum Charge: A plasma torpedo cannot contain more than one photon
charge.
Once Per Turn: A given plasma launcher cannot inject more than one plasma
per turn.
Pseudo-plasmas: A pseudo-plasma may have a photon charge injected into
it. It functions exactly as if it were a normal plasma and will launch the
photon charge at the appropriate time(s). This ability does not allow a
pseudo to be bolted or carronaded.
Launching: A Photon-Plasma is launched,
moves, loses warhead strength and is damaged in all ways as any other plasma
torpedo until the moment the plasma torpedo is destroyed at which time the
photon charge is fired. No plasma launcher may fire a photon charge by
itself.
Shotgunning a Photon-Plasma:
When photon-plasma is shotgunned, one of the plasmas must be designated to
carry the photon charge at the moment of launch. The limits placed on the
plasma launcher preclude more than one photon charge in a shotgun.
Identification and Pseudo-Plasmas: The
presence or absence of a of a photon charge in a plasma is not revealed until and unless the
plasma is identified or destroyed/impacts. Photon-plasma pseudo-plasmas can be set to simulate
the presence of a photon charge if identified. Whether the pseudo
simulates the presence of a photon charge or not must be set before the scenario
stars and may only be changed between scenarios.
Real Photon Charge: A pseudo-plasma carrying a real photon charge will
show a single photon charge ragrdless of whether it was set to simulate one.
The actual photon charge will outshine the simulated one.
Identical: Photon-plasma Pseudo-torpedoes function in all ways like X1
pseudo-plasmas. They may be used as ECPs, etc.
Phaser Damage: Photon-plasmas are damaged
normally by phasers and phaser-like effects. The photon charge cannot be
damaged or destroyed by any means. It is unaffected by phaser damage and
does not interact with ESGs.
Plasma Impact or Dissipation: At the
moment the photon plasma's warhead drops to 0 or it impacts its target, the
photon charge inside is released and attempts to hit the plasma's target. If the plasma impacts or dissipates during movement, the
photon charge will attempt to hit during the DF segment of the same
impulse. If the plasma is destroyed by weapons fire, the photon charge
will attempt to hit and damage its target during the Second Hellbore Firing
Opportunity of the same impulse.
Cannot Change Target: The photon charge can only shoot at the target of
the plasma it is embedded in. If that target is destroyed or otherwise
rendered unavailable (stasis) or illegal, the photon charge is lost.
To-Hit: Once released, the photon charge does not hit automatically.
It is treated in all ways as a direct-fire weapon launched from the plasma's
final hex of existence. The Photon charge uses the photon torpedo hit
chart but has no myopic zone. At range 0-1, the photon charge uses the overload chart to hit,
then uses the standard photon chart at all other ranges.
Electronic Warfare: If using electronic warfare, the photon charge gains the benefit of
any ECCM available to the plasma torpedo at the moment of impact or
dissipation. This includes the normal +3 ECCM all plasma torpedoes
get and any ECCM from the controlling ship, if any. Any EW changes
made by the controlling ship after plasma impact/destruction are ignored for
purposes of photon charge hit/miss. The target's EW situation is not
assessed until the photon charge rolls to hit.
Bolting:
A photon-plasma bolts in all ways like a normal plasma torpedo. Damage
from the plasma part is figured normally also. The plasma charge becomes a
part of the plasma bolt. If the plasma bolt hits, the charge hits.
The charge does not roll to hit separately. The full photon damage is
added the plasma-bolt damage. Its warhead is not cut in half as plasma
warhead is.
EXAMPLE: A M-photon plasma with
the photon charge armed is bolted and it hits its target at a range of 4
hexes. Its full warhead strength is cut in half to 20, then the 8-point
photon charge is added for a total damage of 28.
Carronade: A plasma launcher capable of using the Plasma
Carronade option acts the same way as a bolted plasma. The photon damage
is added to the carronade damage. If for any reason the carronade does no
damage, the photon charge is considered to have missed.
Complete Plasmas only: A photon charge cannot be injected into an
incomplete plasma. A launcher that carronades a plasma in its first or
second turn of arming (or under rolling delay) or other incomplete states of a
plasma torpedo, cannot inject a photon charge into the plasma. If the plasma
becomes fully armed, even if at the moment of carronade or bolt, it may accept
the injection of a photon charge.
Repair: A photon plasma launcher may
not be repaired as any kind of photon torpedo. It may be repaired as a
non-photon plasma at a discount of 2 points.
Balance:
1) Improvement - Allow a photon charge a "second chance" roll to hit a
target if its plasma is bolted and misses (or in teh case of a 0-damage
carronade).
2) Reduction - The photon charge must roll to hit a target independently
in all cases of plasma bolts and carronades.
Gorn
Photon-Freezer System
Designer's Notes:
I originally intended each plasma torpedo to be outfitted with its own
photon-freezer box. As I wrote out the Photon-Plasma rules, it occurred to
me that it would be awkward to keep track of two different arming sequences, so
I decided to do what I did with the ISC plasma caster: Split the photon freezer
away from the plasma and have it be a system box in its own right.
Concept:
The Gorns outfitted their ships with photon freezer units capable of arming
the photon torps needed for their plasmas. These were patterned after the
photon freezer boxes found in some Federation carriers. A high-speed, short-distance,
hard-wired transporter system connected a freezer with a plasma launcher.
No Independent Firing: Gorn ships could not stand the shock of firing both plasmas and photon torpedoes so the
freezer boxes were built with
no firing capability of their own. They exited solely to produce photon
charges to be injecting into plasma torpedoes.
Destruction: Despite being variants on the
photon torpedo, Photon Freezers are destroyed on "Drone" hits
Weapon Status: At WS-0 or WS-1,
freezer boxes start the game empty. At WS-2 any or all freezers may start
the game holding charges. At WS-3, photon plasma launchers that are holding
plasmas at the start of the game may also have photon charges already injected.
A corresponding number of freezers must start the game empty, however. The
number of plasmas that are holding photon charges at start cannot exceed the
number of freezer boxes on the ship.
Deployment: The photon-plasma system was
produced exclusively by the Gorns. Some weapons found their way into
Orion hands. The system can only be placed in X2 technology option mounts.
Photon freezers take up one option mount. Despite using photon torpedo technology, the Gorns developed
the system without Federation help and chose not to share it with them.
Arming: A Photon Freezer is armed by applying a total of 4
points of warp power to the freezer over 2 turns. As with a normal photon
torpedo, arming energy may only come from warp power. It may be
fast-loaded.
Fast-Loads: IA photon charge may be armed over the course of a
single-turn by allocating to the launcher the full 4 points of warp power needed
to arm the charge. A charge may be fast-loaded at Energy Allocation or
using Reserve Power. Fast-loaded photon charges must be used or ejected at
the end of the turn. They cannot be held.
One charge per turn: No photon freezer box may produce more than one
photon charge per turn. It may produce a photon charge and begin arming
another from reserve power when the freezer box is empty.
Reserve Power: Reserve power may be used to start or finish arming of a
photon charge or fast-load a launcher that may be legally armed. Finishing
a photon charge on the same turn it began arming is considered to be a
fast-load.
Ejecting: Freezer boxes can eject a partial or complete photon charge. If a charge is
ejected before the end of the turn, another charge may be partly or completely armed in the freezer.
The ejection system cannot be used to fire a photon charge as a weapon.
Standard-Load Only: Like the carrier-based
photon freezers, the photon freezer can only arm a standard 8-point
photon. The freezer may not create overloads or proximity warheads. Unlike photons produced
by carrier-based photon freezers, the photon charges produced by Gorn photon
freezers have a maximum range of 30.
Holding: A photon charge in the freezer may
be held for 1 point of power from any source. This energy must be paid at energy
allocation or the plasma charge is ejected.
Transfer: One the Impulse Activity Segment
of any impulse a photon freezer may transfer its photon charge to a plasma
launcher. Once transferred to a plasma launcher, a photon charge may not
be moved to a same or different freezer box or another plasma launcher. The plasma launcher
must immediately inject the photon charge into the plasma it is holding. Due to safety
restrictions, only a plasma launcher with a fully armed plasma torpedo may accept
transfer of a photon charge. Once a transfer takes place, the freezer may
not be rearmed until the following turn.
Timing: Photon charges may be transferred any time reserve power may be
applied to a plasma launcher. Transfer may occur simultaneously with
completing the arming of a plasma, even if the plasma is not the larges size the
launcher is capable of. Transfer of a photon charge does not require an
actual expenditure of reserve power.
Limited Transfer: Photon charges may not be transferred to any other area of the
ship. Photon charges may not be loaded onto fighters of any race
(including Gorn and Federation) by any means. Some
ship descriptions may limit what plasma
launchers a given freezer box may transfer photon charges to.
Repair: A photon freezer may
not be repaired as any kind of photon torpedo.
Kzinti
Phaser-Matrix
Designer's Notes:
This system was originally proposed by Shannon Nichols. I am adopting it
because it seems to fit the Kzinti philosophy of "Phasers, and lots of 'em."
As I dug into writing these rules one thing became clear. This was better
than having a P-5 that normally armed for 1.5 points of power. So I added ECM and die roll penalties as a way of
balancing the advantages.
I have since drifted into the camp that thinks P-5s
should cost one point of power to arm. At that point all the inequities go
away as the Kzinti is still paying 1.5 power for its P-5 shot. All rules
referring to ECM penalties have been removed, save for a simplified version in
the Balance section.
Concept:
The Kzintis, frustrated by their inability to duplicate the Hydran gatling
phaser, poured tremendous energy into trying. A minor research project
into phaser harmonics bore strange and unexpected fruit in the creation of the
matrix phaser, where small phasers were able to combine and increase their
amplitude and mimic larger phasers. The weapon
had the happy side-effect of restoring the hard-to-mizia quality to Kzinti ships.
Destruction: Each element of the Phaser
matrix is destroyed on a "phaser" hit. It would take three hits
to destroy an entire matrix. Phaser matrix elements burn out more randomly
than other phasers. The same phaser matrix cannot be damaged twice in
succession within the same volley.
Deployment: The phaser-matrix system was
produced exclusively by the Kzinti. Some weapons found their way into
Orion hands. The system can only be placed in X2 technology option mounts.
Each element of the matrix takes up one option mount and may be used in concert
with any other element in the same block of mounts. Elements in different
blocks of mounts cannot be combined.
Arming: Each element of a phaser matrix
arms for 1/2 point of power. The normal phaser capacitor rules apply to
phaser matrices.
Size of a matrix: A phaser matrix is made up
of all the elements in a common group of element boxes. Only elements
located in the same box block can combine to create more powerful phasers.
Option Mounts: Matrix elements in common block of option mounts are
always considered to be a part of a single matrix regardless of the number of
elements.
Firing: No element of a phaser matrix may
fire more than once per turn or within 8 impulses of that element's previous
firing. No single matrix may fire more than once per impulse unless
engaging a target using X-Aegis. Any number of elements may fire under
X-Aegis at any number of X-Aegis-legal targets.
Example: when engaging
a ship (SC2-4), a phaser matrix could fire a single element or an element
combination at that ship each impulse. When facing a
unit that can be engaged using X-aegis (SC5 and smaller), such as a PF or
seeking weapon, each phaser matrix element is for all practical purposes an
independent P-3 that may be fired accordingly or combined.
Combining elements: When firing a
phaser-matrix at the same target, the firing player
may choose to fire two or three elements in concert to produce the effect of
increasingly more powerful phasers. (See damage rules below) When
engaging targets through X-aegis, the phaser matrix may fire P-1 or P-5
combinations at any valid target on any available aegis step as long as the
target is otherwise legal to fire at.
Example: A phaser Matrix-armed Kzinti facing a
plasma-armed ship engages a hostile plasma ship a torpedo targeted on it, and a
torpedo targeted on a friendly base. The plasma ship is at 6 hexes range,
the plasma targeted on the base at 3 and the plasma targeted on the Kzinti is at
1 hex. On the first Aegis Step (general weapons fire) It combines elements
from an array to hit the plasma ship with a P-5 shot. The Kzinti then
decides to help out with the base's plasma defense and combines two more
elements to hit the plasma with a P-1 shot on the second Aegis Step. It
could not engage the plasma ship because ships cannot be engaged on any aegis
step but the first. At the same time as the P-1 shot is taken at the
plasma targeted on the base, the Kzinti fires 2 more elements at the plasma
targeted on it.
Damage: Damage from a phaser matrix is
variable based on the number of elements combined.
Damage (one element): Each element by itself does damage equal to a
phaser-3.
Damage (two elements): Two elements combined
do damage equal to a phaser-1.
Damage (three elements): Three elements
combined do damage equal to a phaser-5.
Balance:
1) Reduction - The P-1 and P-5 damage rolls are degraded by a +1 shift
above and in addition to any EW shifts.
Kzinti Drone Array
Designer's Notes:
The original system was more designed to be a high-speed D-rack with a dash of
C-rack thrown in. The launcher would be able to launch a drone from either of
its 2 magazines every 20 impulses. As I thought about that, I decided that
it was mostly a high-tech repackaging of the F-rack.. So I retooled it to its current form.
Concept:
Looking to increase their drone racks' ability to sustain fire, the
Kzintis capitalized on D/H-rack technology to create a completely disconnected
launcher/rack drone system. Launchers could launch drone from any rack desired, allowing them to
empty a few racks one turn and be reloaded while the launchers used other racks.
Deployment: The the Drone Array was
produced exclusively by the Kzinti. Some weapons found their way into
Orion hands. The system can only be placed in X2 technology option mounts.
Each rack takes up one option mount. Launchers take up no additional
option mounts. All Drone Array racks in the same block of option mounts
are considered a part of a common array. Racks from other blocks of option
mounts cannot be made a part of a common array. No other type of drone
rack can be included in the array, even if it is in the same block.
Destruction and Repair: Each "drone" hit taken by a drone
array destroys one rack and one
launcher. Repairing a rack puts a launcher back in action at no extra
cost. Racks and launchers may not be repaired separately.
Firing: Each launcher within a block of
adjacent drone array racks may launch one drone
of any size from any rack in that block. It may not launch drones from
other drone arrays or from other types of racks. Drone array launchers may
not launch 1/2-space drones or ADDs. A drone array launcher
may launch one drone every 20 impulses. A launcher may launch two drones
within a single turn as long as they are launched 20 or more impulses apart.
Rack Storage: Drone Array racks may hold 5
spaces of 1-space and 2-space drones. They may not be loaded with 1/2 space drones
or ADDs.
Reloading: A rack in a Drone Array may be
taken out of service and reloaded using the normal procedures for reloading a
drone rack. Taking a rack out of service does not take the launcher out of
service, however. It is still free to launch drones from other racks
within its array, if any.
Go to X2 Proposals page
Go to X2 Page
Drop a line to Vorlonagent